
Browse all guides
ADD TO YOUR WIDGET
Weather widgets
The temperature now, the hours ahead, or a forecast for the next few days.
In this guide
Choose how much weather you want to see#
You might want only the temperature now, or you might want to know whether the afternoon will get colder. Widget Ninja can show one weather value as text, several forecast values as a chart, or separate forecast hours and days in a list.
For a quick start, edit an existing weather design in Gallery. To build your own, open a saved widget in Library and tap Design Visually. Then add the pieces you need. Weather previews can use example values while you design; your own weather needs location access.
Start with a weather design#
Open Gallery and look for a weather design. Sunroom shows current temperature and conditions. Temperature Study charts the next twelve hours. Field Notes uses a forecast list.
Open the design, choose a color and size, then tap Add to Library. Open your saved copy and choose Design Visually to edit it.
Add the current temperature#
Open Live Data
With no layer selected, tap Add → Text & Data → Live Data.
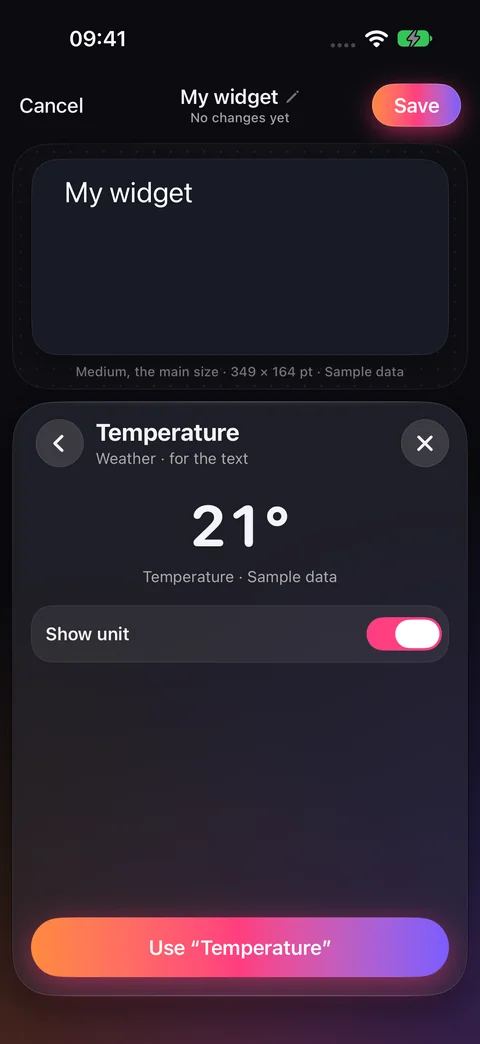
Choose Temperature
Tap Temperature in Suggestions, or search for its name.
Set Show unit
Leave it on to show the degree symbol after the number.
Tap Use “Temperature”
The app adds a text layer connected to the temperature. Use Text to change its type or color. Tap Save to keep your edits.
Add another weather value#
Use the same Live Data picker to add Feels like, Condition, Condition emoji, Today’s high, Today’s low, High and low, Humidity, or Chance of rain. Each becomes a text layer you can style.
To change an existing layer, select it and open Content → Change. See how Live Data works.
Show a forecast#
- A chart
- Add a line or bar chart. Select it and open Data → Shows. Choose Next hours or Next days, then choose its measurement and time range. Read the Charts guide.
- A list
- Under Add → Group & List → List, choose Next hours or Next days. Choose which items and a row style. Read the Lists guide.
Use weather for your location#
Gallery previews and an editor with Sample data on show example weather. With no layer selected, turn Sample data off to check your own values.
Weather needs location access. Review the access controls in the tool, or open Library → Connections. If a forecast is unavailable, check access before treating it as a zero reading. Check your data and access.
Put it on your Home Screen#
Save your design, add the app’s widget to your Home Screen, and select your saved design under Edit Widget → Content. Follow the Home Screen steps.
Checked against the app · October 6, 2026.
Screenshots use example data or the app’s test image.