
Browse all guides
ADD TO YOUR WIDGET
Text, Date & Time
A label, a date, or the time. Set the words, then make them fit.
In this guide
Words you type, or values the app fills in#
Use text for a label such as “My week”, a note, or a number you type yourself. Those words stay the same until you edit them. Date, Time, and Live Data also appear as text, but the app fills in their value when it draws the widget.
For example, typing “Monday” makes a fixed label. Adding Date gives you date text that follows the date. Both can use the same font and color controls.
Open a saved widget in Library, then tap Design Visually. Content controls what the words say; Text controls how they look. These are separate buttons in the toolbar after you select the text.
To find Add, tap the empty canvas outside the widget preview to leave any selection. Add appears in the toolbar below the preview. Once you add a piece, select it to open its own tools.
Add text#
Tap Add → Text & Data → Text
A new text layer appears on the widget.
Open Content
Choose Your text and type the words you want.
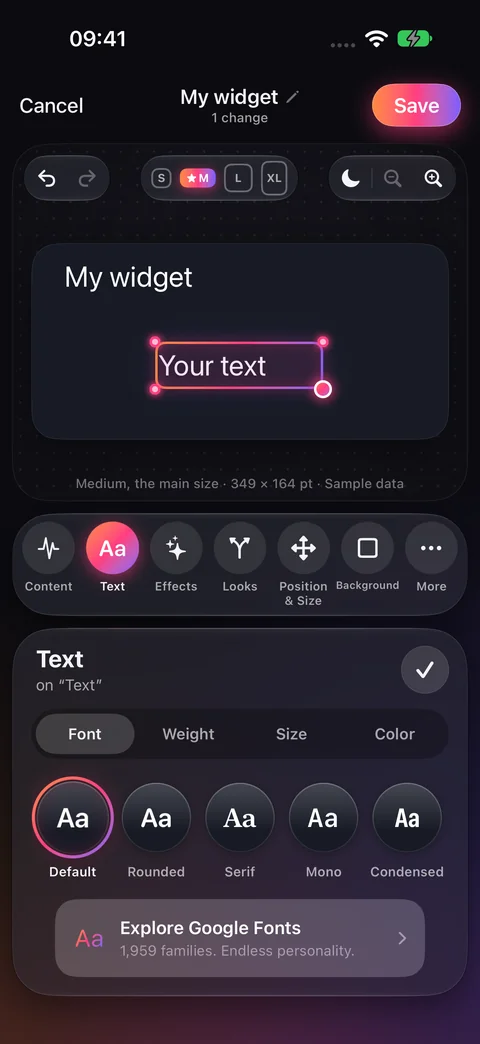
Open Text
Choose its font, weight, size, and color. Tap Save when you finish.
Change the type#
Tap the words on the canvas, then tap Text in the toolbar. The buttons at the top of the Text panel choose what you change:
- Font
- Tap Text → Font. Choose a built-in style, or tap Explore Google Fonts to browse more fonts.
- Weight
- Tap Text → Weight. A lighter weight uses thinner strokes; a bold weight uses thicker ones.
- Size
- Tap Text → Size and drag its ruler to make the letters bigger or smaller. The alignment controls here change how the words line up within their box.
- Color
- Tap Text → Color. Choose an automatic color, a preset, your own color, or a gradient that blends between two colors.
Add a date or time#
Under Add → Text & Data, tap Date or Time. These add text layers connected to the date or time. They are not fixed words you need to change each day.
Select the layer and open Content to change its live value. Use Live Data for other date and time fields. Use Text to format it.
Put an icon before the text#
Select the text and open Content → Icon. Choose a quick icon or tap Choose another icon. Choose None to remove it. A separate Icon layer gives you an icon you can position on its own.
Use a live value#
In Content → What it shows, choose Live data. Choose a field in the picker. For a layer already using live data, tap Change. Follow the Live Data guide for time ranges, units, and decimals.
Checked against the app · October 6, 2026.
Screenshots use example data or the app’s test image.